Firmware Download
Please read all instructions before using the firmware.
Startup firmware without IR remote: SeaGlideV0_9noIR.ino
Full code: SeaGlideV1_0.ino
Firmware Introduction
There are 3 components that must work together for you to be able to control your SeaGlide.
The Arduino IDE: The software you will use to open and edit the SeaGlide code. The IDE is what will upload your code onto the glider's Arduino Pro Mini.
The FTDI board and its driver: The small red board that plugs into your Arduino Pro Mini is a piece of hardware that enables the computer to talk to the Arduino Pro Mini. However, the FTDI board also needs a driver, which gives your computer instructions on how to use the FTDI board.
The SeaGlide Firmware: The code that contains the instructions for the glider's functions. We have written the basic Arduino code to get your glider running. It is up to you to modify it for your needs!
To Upload the SeaGlide Firmware to Your Arduino Board Follow These Steps
1. Download and install the Arduino Integrated Development Environment (IDE)
2. Plug your FTDI board (it looks like this) into your computer and wait for your computer to automatically download the correct driver from the internet. If that doesn’t work, you can manually download FTDI driver. (You may need to restart your computer after doing this)
3. Download the SeaGlide firmware:
Setting up the IR Remote to control the glider requires an extra step, because it requires using a separate Arduino Library. To get the Arduino IDE set up and talking to the glider, we will first try running the buoyancy engine without the IR Remote. After that, we will add the IRremote library and upload the full glider code.
Save the SeaGlide code that does not use the IR Remote SeaGlideV0_9noIR.ino to your computer and unzip it into the Arduino folder, which is most likely in "Documents"
4. Open the "SeaGlideV0_9noIR.ino" file in the Arduino IDE. Arduino might prompt you to create a folder for the sketch, go ahead and do this.
5. Select the Arduino pro mini board from the Tools menu:
Tools > Board > Arduino Pro or Pro Mini

6. Plug your FTDI Basic Breakout board into your Arduino Pro Mini and connect the FTDI board to your computer with a USB mini b cable
7. Select the usbSerial port from the Tools menu:
On Windows: Tools > Serial Port > COM X (usually the highest number COM port)
On a Mac: Tools > Serial Port > /dev/ttyusbserial-XXXXXXXX

7. Then click the upload button

You should then see a progress bar and uploading dialog

Followed by "Done Uploading"
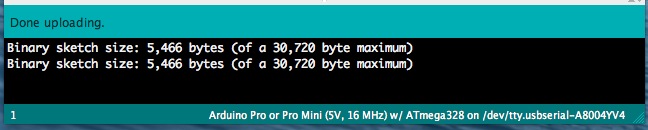
You are half way done - your Arduino Pro Mini is programmed and ready to drive your glider without the IR Remote!
Now go ahead and press the power switch to run your buoyancy engine.
Once your buoyancy engine is running you can move on to installing the IRremote library:
Download the IRremote Folder to your computer. It will be automatically saved as a .zip folder - do not unzip it!
Run the Arduino IDE (If your Arduino IDE is already running, close it and restart the program)
Go to the "Importing a .zip library" section on the Arduino Libraries page and install the IRremote library.
Now download the full SeaGlide code SeaGlideV1_0.ino to your computer and unzip it into your Arduino folder and open it in the IDE as you did before in step 4.
Push Upload and you will have a fully functional glider!
Troubleshooting
If you run into a compile error that mentions "RobotIRremote" the compiler has detected a conflict between the third party (Adafruit) IRremote library that SeaGlide uses and the RobotIRremote library that recently started shipping built into Arduino.

The most likely cause for an error that mentions "RobotIRremote" is that IRremote is not installed. see step 3 above to install the IRremote
Quit the Arduino IDE.
Download the IRremote folder from here.
Copy the IRremote folder into your Arduino libraries directory. Usually .../Documents/Arduino/libraries
Launch the Arduino IDE and compile.
For more detailed instructions to install third party Arduino libraries see the official Arduino guide.